Wednesday, January 30, 2013

On schedule!

I have successfully met the requirements imposed in my business plan. I am happy to be on track and have learnt quite a bit throughout these last two months.


I've found that creating a schedule and adhering to it is beneficial is several ways:
  1. You become organized and know exactly which direction you are heading in. I've found myself often times that, even though I was working quite a lot and have been watching tutorials, that I was a bit lost as I wasn't sure what my final goal was. This feeling of stray unbalances your focus and has a negative impact on your progress. 
  2. It's all about schedules and deadlines in a professional environment. By organizing myself via a schedule I am, in a way, mimicking an environment which I am going to be faced with at a proper workplace.
I have learned a great deal about different workflows and now understand much better how I need to plan my workflow for specific assets.

The upcoming month will see me continue down this path. Also, there are some good networking possibilities, which I will surely attend:

Study-wise, I will focus on improving my texturing skills, because at the moment I feel that is the area I am lacking in a bit. I will take a look at the very popular painting program, MARI to see whether it can be of use to me. Meanwhile, I will continue with the UDK training as well. I need to improve FAST with UDK as by the end of this month I hope to have started importing assets for my final, SS2 project.

Work-wise I will import the two weapon models I have created into UDK and create convincing material for them. I aim to enter at least 2 Polycount challenges, competitions and/or art jams. 

Online networking is going to be as crucial as ever as by the end of February, I hope to have added a few more artists to my contact list.
I will attend Google+ Hangout sessions, which I have done so on several occasions by now. They are a very interactive and fun way of working and networking at the same time. You talk to fellow artists via a microphone and share each other's screen so everyone can see what the others are working on.


Again, here is February's business plan:


Tuesday, January 29, 2013

Dishonored weapon finished

I've used ZBrush's Polypaint feature to lay down the basic color values for the gun. It does take a while and is a bit more time consuming than doing it in Photoshop for example, but you actually see, in 3D space, where and what you are painting. It's also a great way to paint in some highlights for the small, chamfered areas which otherwise would be hard to identify on the UV sheet. You paint in those highlights as guides and then in Photoshop you clearly see where you need to tweak those values.

After the baking and texturing was finished, here is what I ended up with:


Friday, January 25, 2013

Practicing with UDK

I have been making some good progress with UDK. Thanks to the 3DBuzz tutorials, I am understanding the basics of the program.

I have finished studying the next three chapters:

  1. UDK:   Part 2 - Creating a Simple Level 
  2.           Part 3 - Lighting (Introduction)
  3.           Part 4 - Geometry Mode
After using programs such as 3DSMax and Maya, understanding the basic workflow of UDK has not been hard at all.
Without doing any static mesh import, I have created a practice scene with some very basic elements. I have only used models which can be found in the Content Browser. There are a lot of modular ones, so I just legod some things out, examining the advantages of modular assets.

First blockout
The blockout was done using only BSP brushes. I have tried to be very clean about my units, so everything is evenly positioned from the center point with proper scale.


I have looked at static meshes that emit light, by baking the lighting information into the textures around them. The little lights on the walls are meshes like that. Also, I've added a post-production effect as well to the second room of the building. I've also been able to slowly transition this effect, so that the color changes don't just pop, instead they slowly fade in and out.
I created a basic trigger for the door as well, so that when a player approaches it, it opens with proper sound effects. I've created these via Unreal Kismet and Matinee.

Very cool stuff indeed, I`m very eager to continue with the tutorials and start practicing with some very unique designs.

Tuesday, January 22, 2013

Practicing game art - Warcraft axe

I have chosen to create a game asset based on a concept art created by Blizzard Entertainment. It is a weapon with quite an interesting, fantasy shape. You have a bit of organic forms in it, but a lot of hard surface modeling needs to take place as well.


First step was to analyze the concept, I've began drawing through on it, examining the shape and forms. A side view was not provided to the community by Blizzard, hence I had to pay attention to the tones and shades to identify the depth and actual position of some elements in 3D space.

I went ahead and created a block out of the axe and setting it up with even and square topology so it properly subdivides in ZBrush.
Inside ZBrush, I decided to go with a layered approach. 3DMotive tutors highly recommend working with layers as this is a non-destructive workflow. You can test out various ideas on your model and if you don't like them, you just delete the layer. Or, if some details are exaggerated you can easily pull back the strength of that layer to minimize the effect.


The plan was to, form now on, post all of the work I create to Polycount's forum to receive proper feedback. Also, I mean to post updates very often so people can see that I am active and serious about my art. It's not about showing off, I really want to be as active as I can be to develop myself as much as possible.
However, I need to realize when I should post an update. To post an update, just for the sake of posting doesn't help me or anyone else. I need to have good progression between the different versions of my assets to get proper feedback and so people can see whether I am heading in the right direction or not.
I planned to only post a version when it has been textured.

Speaking of texturing: I've used ZBrush's Polypaint functions to block in the main colors and values of the axe. I have learnt quite a lot from 3DMotive's Hand Painted a Weapon Texturing tutorial and I've used the same approach with this axe. Block in the main values, paint some light and specular information into the color to better bring out the important details.

Meanwhile, I often turned to the Polycount community with difficulties I was having (mostly technical). The people over there are just amazing and share even the most valuable and helpful information very kindly.


Once I have my maps baked out, I can finalize my diffuse map by hand painting some extra details onto it in Photoshop. Also, I will bake out a Normal Map, along with an AO map. I will use nDo 2 to create new maps, like Cavity Map and blend that detail into my final Diffuse as well.
There are a lot of possibilities technically, I have to pay attention to the general appeal of the weapon and work towards improving that.


I've rebuilt the topology in 3DSMax to get the final, game mesh. I've then baked the high poly information onto the low-poly and tweaked the maps to get the following result:


This is a Realistic view from 3DSMax's viewport, hence the specular map has no effect. Once I learn how to properly import an asset into UDK, I will take this axe and test it out in there as well.
Final triangle count is 4,304 with 1024x1024 maps applied.

Friday, January 18, 2013

A bit of networking DEUTSCHE BANK Workshop

The first networking possibility of our 2nd term was provided via a workshop. On January the 15th, at the School of Art on Margaret Street.

Despite being a workshop, the place was packed with mostly students, but I noticed some people possibly from various companies interested in the event.

Max Comfort talked about a wide range of issues when it comes to getting started in the professional world. He talked about the importance of networking and gave us some tips on how to approach business professionals. Some good tips were given regarding business cards as well.

He talked about real life issues, instead of the dogmatic things, which I've found very refreshing and useful.


The workshop provided the possibility to get to know some people. I've been able to talk with quite a few BCU students. Even though they are on a whole different kind of course (fashion, jewelry etc.) its still good to have contacts within your own university.

Max talked a great deal about freelancing possibilities and how to plan such a career. Freelancing involves a great deal of tax planning and people who have no experience regarding this need advice. He examined and explained the common issues of freelancing and went on to show us some methods on how to plan and calculate your financial situation. Topics like Cashflow Projection, GANTT Chart etc.

I might end up revisiting the content of this presentation as eventually I might have to look for freelance work and I will surely need some guidance with various issues.

Thursday, January 17, 2013

A bit of a dissapointment - Part 3

I've felt the planning stage was ready to start blocking out the main shapes of the scene.
I have looked at several tutorials during the Christmas break and have been constantly learning new things since.

The aim is to stick to the business plan I've developed. Until now, I have watched the following tutorials:

3DMotive.com:

  1. Asset Workflow: The Briefcase
  2. Workflow Series: The Treasure Chest
  3. Texturing and Baking with ZBrush, xNormal and nDo 2
  4. Baking Normal Maps: Tips and Tricks
Digital Tutors:
Eat3D:

Gnomon Workshop:
  1. UDK: Part 1 - User Interface
  2. Creating a Simple Level
This may seem quite a lot and yes... I did spend quite a few hours in front of the screen. Instead of watching films when going to bed, I've put in a tutorial and continued watching it the next morning. 
I've learned a great deal and have started to get a clearer picture on how I want to plan my workflow.

For this competition, the first thing I am going to use which I've learned from several of these tutorials, is a blocking out approach. First, I will use very very basic shapes to block out the main shapes of the scene.
This will help me to adjust the scale, the position and angle of several objects before they are detailed. It's much easier to build up your scene this way, because if you want to change something, but you have already added some fine detail to it... it's going to be a pain.

First blockout:


It started to shape out just fine and I am going to skip ahead to the very last version of the blockout I have gotten to as the disappointment was ever close.


I've started using ZBrush to add some detail to my most important shapes. This is part of the blocking out stage, I wanted to see how these will look after textures and depth information will be painted into them.
The structure was coming along nicely as well.. I did feel there was more work with it.. that it was still lacking something, but I felt confident that I was on the right track.

One issue was time: I had 2 days to finish this entire scene and I felt I could really quickly texture the entire scene. The slap to the face came when I read through the extended rules of the competition, which states that  only students studying in the U.S. or Canada are eligible to enter. 

Well... this was really heart braking to read.. and after having put this much effort into it.... I smiled! :) 
I smiled because I felt that I did not lose anything, on the contrary. Yes, it is very sad that I can't get some exposure, but this project pushed me so much to learn new things and to actually do some professional reference gathering.

I have been suggested by the previous winner of the contest, Jessica Dinh, to post this work up to the Polycount forums and keep on working on it. There are a lot of Blizzard artists checking those forums, so I will still be able to get exposure for my work.


But, I felt that with 2 days left, rushing through the texturing and rendering stage would not be the best thing. I would not learn much and I would not be able to bring the maximum out of this concept. I've decided to keep this scene as a test base for the new things I learn. I have a vast list of tutorials ahead of me and I need some sort of test scene which I can practice on and with.
I was thinking of importing this environmental piece into UDK, but that requires more learning as, right now, no proper importing could take place... just messing about.

Wednesday, January 16, 2013

A bit of a disappointment - Part 2

Having looked at Sekler and Romanian architecture, I did not come up with anything that would be unique enough for the environment. I've decided to do an extensive search on the internet on whatever I can find from the medieval ages.

Looking for reference is not just about finding something that perfectly suits your expectations and then "just" copying it. As you look through hundreds and hundreds of images your image library starts to build up. By this I don't just mean a library on the computer, but inside your mind as well. Your imagination starts to widen and quite often I've found myself coming up with new things by looking at something that already exists. Reference images can ignite one's imagination to think of something new and that is an important trait to have.

I have found a vast number of images.. literally. I've gathered about 600 in total, which I will not put up here. I've also checked some concept art websites as well and in the end came up with a smaller library composed of the images that I can inspire something new from:


I really got hooked on the bat theme and the idea of actually making a structure look like a dragon is imbedded into it inspired me even more. I also like these impossibly narrow cliff formations, which then widen out, offering a planar type of surface. Of course, this is all impossible in real life, but the beauty of CGI has always been the possibility to make the impossible look actually believable.

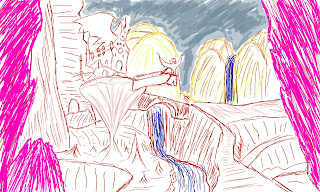
I began drawing a basic concept of the building I was after:


Concept of the environment:


A bit of a disappointment - Part 1

Throughout the Christmas break I have been quite busy preparing myself to enter the Blizzard Student Environment Art Contest.
I have taken this very seriously and once my SS1 module finished I began brainstorming about what I wanted to create exactly.

The requirements were pretty clear: I need to create a somewhat small environmental scene that features a small structure, rocks, grass, trees and props. All of these have to match the polygon count of the models found within World of Warcraft.... which is very low.

Another important element was to present something that has not been witnessed in the game before. Basically, design something new, something refreshing to the game.

My initial idea was to inspire something based on the Sekler culture, which I am part of myself. Sekler people are a group within the Hungarian culture. Seklers used to be the guards of the Kingdom of Hungary. In 1920, however Hungary shrank to a third of its size and a lot of Hungarians found themselves in foreign countries. The Sekler population ended up in Romania.
The Sekler culture has its own unique architectural style and I was aiming to create something based on this.
Older Romanian architecture has crossed my mind as well, due to their mystical nature. I decided to explore some old churches in Moldova, bordering Transilvania.


The pictures above showcase Romanian churches. Sadly, I did not find them unique enough in order to be very different in comparison to what a player can find in World of Warcraft. I haven't seen churches EXACTLY like these ones, but there some which look pretty similar.
I did note one or two small details that I might use later on when I concept my structure, though, so the trip was not a failure my any means.
I also liked the ruined wooden planks on the church to the left. It is good reference for texture painting.. I took some close up shots.


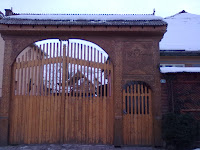
The next day, I went to several small Transilvanian villages which have a lot of Sekler decoration themed structures, especially gates. I've found that World of Warcraft designers do like their gates and a Sekler gate would be an awesome idea as it is quite different and detailed. That detail though is surface detail, which would allow the possibility to really push my texturing skills. WoW is a completely hand painted textured game.


This detail was really inspiring to see and I already knew that I somehow want to incorporate a gate for my architectural piece. The gate would serve as a tool that sets the initial mood of the building. I wanted to take some of the details from these Sekler gates, but improve the silhouette quite a bit as this are to square to suit WoW's style.

To be continued...

Tuesday, January 15, 2013

Trying to stay active during the Christmas break + DISSERTATION

After the hand in of my final projects for SS1, I've decided to remain somewhat active during the break as well. It wouldn't be a good idea to completely shut your working brain off for a complete month, because as university recommences, new project and tight deadlines await.

One of these projects involved researching and writing my final year dissertation.
I wanted to take the opportunity at write a dissertation that is 100% related to the issues I've been experiencing as a 3D Artist.

With the approach of the deadline for our Professional Practice module, I wanted to help myself with this dissertation to better plan out my future business plan.
If I examine my university modules closely, it's obvious that there is a pattern and that they are connected. This third year ,especially, is a journey towards becoming fully ready (technically and organisation wise also) to enter the professional world.

At the start of third year, I was immediately faced with a dilemma: my initial plan was to prepare myself as a Generalist. Someone, who can perform in all of the main areas of CG. With the start of our SS1 module, I had to do a significant amount of research on the CG industry and soon realized that I seriously need to re-think my approach.

I always aimed to work at a high profile company, on one of the most influential games or cinematics of today. To sum it up in a nutshell, based on where my ambition lies, I learned that I want and need to specialize in Environment Art, with a pronounced approach to games over cinematic work.

The dissertation aims to act as a guide to people who are in a similar situation I was before the start of third year. The confusion whether to become a Generalist or a specialist is a serious one and can result in a bad business plan for an aspiring artist's future.

Click HERE to download the dissertation.