Showing posts with label 3DSMax. Show all posts

Friday, February 22, 2013

The Crest of Silvermoon - Part 1

My aim is to practice the "World of Warcraft style" as much as possible. My aim is to get into that kind of sector once I graduate. It is quite a distinct, unique way of producing art. Almost every form, asset, building and detail is an irony of its original self. Details are very chunky and elements like roof tops or foundation blocks are much bigger and curvy than in real life.

Colors and textures are of a cartoony nature, but not too much. The game does not look like a proper cartoon, but it incorporates several details from that style/genre.

Here are some of the WoW artwork I've looked at. I did not want to create a scene as that would have required my concentration to spread out on several elements. Instead, a single asset seemed like a good choice, as I can focus only on it and not be distracted.

Concept art:


I've decided to choose an artwork that requires me to touch as many aspects of 3D as possible and at the same time look really really good :) .
The Crest of Silvermoon was the chosen asset:

Crest of Silvermoon
I've decided not to use any photo source for texturing, rather hand paint everything. The style is all about hand painting and I really need to practice it.
Hand painted textures mean that you build up every detail, colour and shading information through sheer colour painting. In CG, you have the opportunity to take real life photos and overlay them on your models. That suits different styles than the one I am aiming for here. With hand painted textures, you have full control over the color values, the shading information and all the small details.

After I've decided on the technical roadmap, I've started blocking out the main form:

Main blockout

Sculpted + base colors
After the main blockout was finished, I've went ahead and imported the asset into the sculpting program called ZBrush. ZBrush is an essential tool as it takes the modeling from a very accurate and technical stage to one that is way more artistic and loose. When I am blocking out the main form, I'm using my mouse to match the concept as close as possible. Accuracy and layout is key here, but you need to add that unique, self touch to the asset that can separate it from the rest.
In ZBrush I use my Wacom tablet and it feels like I'm drawing. It follows the movement of my arm and it feels as if I`m cutting into the surface myself. Makes modeling more fun, which it should be.

After I've added some scratches, bevels, tear and wear etc. through the sculpting phase, I've went ahead and applied some base colors as well. ZBrush provides painting features as well, so before I go ahead and start painting the final texture in Photoshop, it's good to have an already present guide on how you asset should look.


The model I have created so far is the "High Polygon" version, which is NOT suitable for gameplay. It has way too many polygons and would consume too much computer resource for a game to run at an acceptable frame-rate.
I need to create the, so called, "Low Polygon" version and then bake the details onto that from the High Poly. The details will come from the Normal Map, the Color Map and the Specular Map. Specular Map controls where and how the surfaces reflect light. It's crucial, because there are several types of materials on this model that have different characteristics on how they behave in real life.

To be continued in the NEXT post.

Saturday, February 16, 2013

Normal map test and research

Polycount has an amazing collection of tutorials and descriptions in regards to Normal Maps. Their Wiki section helped me understand the very basics, so I have full control over what I do. It takes a lot of practice and I will need to keep producing assets and bump into issues to eventually learn what works for me and what I need to do to achieve specific requirements.

One of the very first tests involved creating a basic, scope-like 3D model. I wanted to achieve the small details through Normal Maps. Areas which are completely flat physically will look like they have small extrusions and details. In these details, you can see light shining in and interacting as you rotate the camera. The surface is flat physically, but the Normal Map tells those surfaces how to look and how to react to light. This saves on resources as you do not need to use high polygon counts. That is why computer games can have models in them which look super-detailed.

WITH NORMAL MAP

WITHOUT NORMAL MAP


The upcomming posts will showcase work that puts me in a "real-life" position to test these theories out. I will look for reference images to create assets to see what issues I bump into and how I can resolve them.

Tuesday, January 22, 2013

Practicing game art - Warcraft axe

I have chosen to create a game asset based on a concept art created by Blizzard Entertainment. It is a weapon with quite an interesting, fantasy shape. You have a bit of organic forms in it, but a lot of hard surface modeling needs to take place as well.


First step was to analyze the concept, I've began drawing through on it, examining the shape and forms. A side view was not provided to the community by Blizzard, hence I had to pay attention to the tones and shades to identify the depth and actual position of some elements in 3D space.

I went ahead and created a block out of the axe and setting it up with even and square topology so it properly subdivides in ZBrush.
Inside ZBrush, I decided to go with a layered approach. 3DMotive tutors highly recommend working with layers as this is a non-destructive workflow. You can test out various ideas on your model and if you don't like them, you just delete the layer. Or, if some details are exaggerated you can easily pull back the strength of that layer to minimize the effect.


The plan was to, form now on, post all of the work I create to Polycount's forum to receive proper feedback. Also, I mean to post updates very often so people can see that I am active and serious about my art. It's not about showing off, I really want to be as active as I can be to develop myself as much as possible.
However, I need to realize when I should post an update. To post an update, just for the sake of posting doesn't help me or anyone else. I need to have good progression between the different versions of my assets to get proper feedback and so people can see whether I am heading in the right direction or not.
I planned to only post a version when it has been textured.

Speaking of texturing: I've used ZBrush's Polypaint functions to block in the main colors and values of the axe. I have learnt quite a lot from 3DMotive's Hand Painted a Weapon Texturing tutorial and I've used the same approach with this axe. Block in the main values, paint some light and specular information into the color to better bring out the important details.

Meanwhile, I often turned to the Polycount community with difficulties I was having (mostly technical). The people over there are just amazing and share even the most valuable and helpful information very kindly.


Once I have my maps baked out, I can finalize my diffuse map by hand painting some extra details onto it in Photoshop. Also, I will bake out a Normal Map, along with an AO map. I will use nDo 2 to create new maps, like Cavity Map and blend that detail into my final Diffuse as well.
There are a lot of possibilities technically, I have to pay attention to the general appeal of the weapon and work towards improving that.


I've rebuilt the topology in 3DSMax to get the final, game mesh. I've then baked the high poly information onto the low-poly and tweaked the maps to get the following result:


This is a Realistic view from 3DSMax's viewport, hence the specular map has no effect. Once I learn how to properly import an asset into UDK, I will take this axe and test it out in there as well.
Final triangle count is 4,304 with 1024x1024 maps applied.

Thursday, January 17, 2013

A bit of a dissapointment - Part 3

I've felt the planning stage was ready to start blocking out the main shapes of the scene.
I have looked at several tutorials during the Christmas break and have been constantly learning new things since.

The aim is to stick to the business plan I've developed. Until now, I have watched the following tutorials:

3DMotive.com:

  1. Asset Workflow: The Briefcase
  2. Workflow Series: The Treasure Chest
  3. Texturing and Baking with ZBrush, xNormal and nDo 2
  4. Baking Normal Maps: Tips and Tricks
Digital Tutors:
Eat3D:

Gnomon Workshop:
  1. UDK: Part 1 - User Interface
  2. Creating a Simple Level
This may seem quite a lot and yes... I did spend quite a few hours in front of the screen. Instead of watching films when going to bed, I've put in a tutorial and continued watching it the next morning. 
I've learned a great deal and have started to get a clearer picture on how I want to plan my workflow.

For this competition, the first thing I am going to use which I've learned from several of these tutorials, is a blocking out approach. First, I will use very very basic shapes to block out the main shapes of the scene.
This will help me to adjust the scale, the position and angle of several objects before they are detailed. It's much easier to build up your scene this way, because if you want to change something, but you have already added some fine detail to it... it's going to be a pain.

First blockout:


It started to shape out just fine and I am going to skip ahead to the very last version of the blockout I have gotten to as the disappointment was ever close.


I've started using ZBrush to add some detail to my most important shapes. This is part of the blocking out stage, I wanted to see how these will look after textures and depth information will be painted into them.
The structure was coming along nicely as well.. I did feel there was more work with it.. that it was still lacking something, but I felt confident that I was on the right track.

One issue was time: I had 2 days to finish this entire scene and I felt I could really quickly texture the entire scene. The slap to the face came when I read through the extended rules of the competition, which states that  only students studying in the U.S. or Canada are eligible to enter. 

Well... this was really heart braking to read.. and after having put this much effort into it.... I smiled! :) 
I smiled because I felt that I did not lose anything, on the contrary. Yes, it is very sad that I can't get some exposure, but this project pushed me so much to learn new things and to actually do some professional reference gathering.

I have been suggested by the previous winner of the contest, Jessica Dinh, to post this work up to the Polycount forums and keep on working on it. There are a lot of Blizzard artists checking those forums, so I will still be able to get exposure for my work.


But, I felt that with 2 days left, rushing through the texturing and rendering stage would not be the best thing. I would not learn much and I would not be able to bring the maximum out of this concept. I've decided to keep this scene as a test base for the new things I learn. I have a vast list of tutorials ahead of me and I need some sort of test scene which I can practice on and with.
I was thinking of importing this environmental piece into UDK, but that requires more learning as, right now, no proper importing could take place... just messing about.

Thursday, November 29, 2012

Optimizing the scene for final rendering

Everything was OK up until this point, except for the render time.
I am aiming for an animation that consists of about 900 frames and I don't have more than 3 days to render. The render time at this moment at 800x600 resolution was 14 minutes. 3 days means 4320 minutes in total, which for 900 frames allows me a MAXIMUM of 4.8 minutes/frame.
I need to lower my rendering time below 5 minutes, that's the key.

But, how to do this? This is a third of the current render time. I need to look at the rendering process and identify the most influencing factors.

Global Illumination has the biggest impact on time it takes to render. This is the process where the program looks at your lights and determines what surfaces they hit. Then, the program needs to calculate how the light bounces off that surface and illuminates other surfaces as well. The light keeps bouncing until it completely decays. The color not only bounces with its original color, but picks up the color of the surface it touched, hence making the calculation of these procedures even more complicated.

So, my idea was to somehow play around with the GI to get a decent enough result, but with less than a third of the current render time.

I have a very animator friend, Kosza Arnold, who has created several animations with a lot of environments in them. I have talked to him about my GI issue and he suggested I look into Lightmap baking.


Lightmap baking is the process of taking the Global Illumination information and putting it straight into the color textures of your objets. Up until now, the color of my objects contain the pure color information, blended together with the Ambient Occlusion map. What Lightmap baking does is that you put the illumination information straight into the color map. So, basically that is the color and you don't have to render the GI out for each frame.
This would significantly lower my render times.

I've done research on how to go about this technically and have found an amazing plugin for 3DSMax, called Flatiron. Flatiron allows you to create Lightmaps in a very fast way. Although, I did not really know how to properly use the plugin at first, as the tutorials provided on their website are not thorough enough. I took a lot of time experimenting and re-doing the lightmap baking process, but in the end it completely paid off.

The result was that I had a scene in my viewport, in FULL REALTIME looking like my 14 minutes long render. Basically, rendering out a frame with all the necessary passes took around 50 seconds. Compare that to 14 minutes and it becomes clear how innovative this procedure is.

Before
After
Before
After

Tuesday, November 27, 2012

Final lighting system

I've done some research on common lighting setups and how they can have different affects on the final outcome. This was done to create a logical setup for my scene as well.


I have also looked at Digital Tutors' Exterior Rendering Techniques with mental ray and 3ds Max to translate the theories to actual technical practice. Even though I am using VRay to render out my animation, the main technical elements are pretty much the same in both renderers and any technique can be easily "translated" from one rendering engine to another.


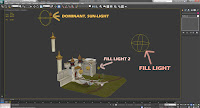
I have used a 3 point lighting setup, where I have a dominant light (orangy color, high intensity) coming from behind the gate, simulating the sun. I`ve also set a fill light in front of the gate (redish color, half the intensity of the dominant light), high up in the sky and another light (redish color, but more towards the whites) in the middle of the scene to brighten things up so the details are more visible.

Sunday, November 25, 2012

Texturing

Texturing was done neither in ZBrush by actually hand painting color and texture onto the models in real-time. I painted these onto the high poly versions of the meshes, so in order to get a color map from the painting I have done, I had to bake out the texture. I've also baked out normal maps and ambient occlusion maps so I can combine these and apply them to the low-poly versions of the models'.


Texturing high poly vs low poly was a bit different. High poly had all the detail modeled into it, so the textures needed only to contain color information and ambient occlusion. But, because of the low polys limited polygon count, some details had to be created through texture information. This is very common in games, when you see certain bumps and extrusions from afar and they actually look like they are physically modeled into the object. Whereas, if you go close to that object, you can notice from an angle that it is actually a flat surface with painted on illusions of surface detail.
I wanted to practice this, hence I`ve created all of the garment models (flags and Kael'thas robe) in low poly and painted the wrinkles and folds into the texture. There are numerous ways of doing this. I`ve chosen the burn and dodge tool found within Photoshop to darken and lighten up the necessary areas to create the illusion of folds. They actually worked :) .

Without Ambient Occlusion Pass
With Ambient Occluson.
With post-work: color correction, applying glow, vignette etc.

Friday, November 23, 2012

Test renders

I have used Photoshop a lot of times to blend an Ambient Occlusion render together with the original to see how the small details look like. This is to get a glimpse of the final affect all the little cracks, nudges etc. have on the image.
Also, PS was used to adjust colors and lighting as well with the help of tools like Curves so I can get quick results right in Photoshop without rendering in 3D.


Slowly, I start adding color here and there, being very careful at this point. I want to get a good foundation upon which I build the rest of the textures. My aim is to shade the main gate structures and the building on the right, because those are the biggest objects in the scene. The shading of those will drive the shades of other elements, so I have paid extra attention here.
This is an early test render of those textures applied:


Here are some of the assets that populate the scene: