Showing posts with label Specialist Study 1. Show all posts

Tuesday, January 15, 2013

Trying to stay active during the Christmas break + DISSERTATION

After the hand in of my final projects for SS1, I've decided to remain somewhat active during the break as well. It wouldn't be a good idea to completely shut your working brain off for a complete month, because as university recommences, new project and tight deadlines await.

One of these projects involved researching and writing my final year dissertation.
I wanted to take the opportunity at write a dissertation that is 100% related to the issues I've been experiencing as a 3D Artist.

With the approach of the deadline for our Professional Practice module, I wanted to help myself with this dissertation to better plan out my future business plan.
If I examine my university modules closely, it's obvious that there is a pattern and that they are connected. This third year ,especially, is a journey towards becoming fully ready (technically and organisation wise also) to enter the professional world.

At the start of third year, I was immediately faced with a dilemma: my initial plan was to prepare myself as a Generalist. Someone, who can perform in all of the main areas of CG. With the start of our SS1 module, I had to do a significant amount of research on the CG industry and soon realized that I seriously need to re-think my approach.

I always aimed to work at a high profile company, on one of the most influential games or cinematics of today. To sum it up in a nutshell, based on where my ambition lies, I learned that I want and need to specialize in Environment Art, with a pronounced approach to games over cinematic work.

The dissertation aims to act as a guide to people who are in a similar situation I was before the start of third year. The confusion whether to become a Generalist or a specialist is a serious one and can result in a bad business plan for an aspiring artist's future.

Click HERE to download the dissertation.

Thursday, December 6, 2012

SS1 module - work compilation

Gates of Silvermoon:


Skeleton animation (at least 720p recommended for optimal view) :


Jewelry animation (freelance):


Arm watch - Photoshop work (freelance) (watches were in perspective, had to redraw them from a perfect front view):


Architectural asset:


Perspective drawing:

Color tests:


Monday, December 3, 2012

Compositing and finishing

I have rendered three different passes to be used for the compositing stage.

The first pass was the color/raw render pass which contained the color information of the scene. Sicne the color now contained the Global Illumination data in it, I've killed two birds with one stones, there was no need for a separate GI pass.

The second pass I have rendered out is the Ambient Occlusion. As mentioned before, this is necessary to bring all of the small details and darker areas to life. The color pass by itself cannot grab all the detail needed, so Ambient Occlusion is a must have.

The last pass rendered out was a so called RenderID pass. This pass gives every model a different, solid color. This allows me to mask out anything within the scene if needed. For example, if I add in a volume light effect, I can block that light out now and simulate it being behind a tower or another building. The light can shine through the leafs of a tree, but in a realistic manner, where the leafs actually obscure the light.


I didn't have to render out a separate alpha bass for the background as that was included in the color pass.

The next step was to take these into After Effects and begin the compositing.

First, I need to combine the maps and then begin to tweak the colors and add an appropriate background as well as the chosen audio.


Here are some images from the final footage:


To create the final image, I have used RedGiant Magic Bullet software, which I've found to be amazing for creating different visual styles and not having to be very technical about it. 
I've also used the Knoll Light Factory plugin for After Effects to quickly add in some very appealing lighting effects, such as simulating the glow of the sunlight and the glow on the blue crystals as well.

I have added an intro scene to the animation to slowly catch the viewer's attention before the main animation part begins. The audio chosen is from the game itself, thus providing the authentic Blood Elf feeling and carrying the animation through.

Friday, November 30, 2012

Feedback

I wanted to get constructive criticism to help better my work and to see what I might not be doing "right" when it comes to recreating the Warcraft style.

There are a lot of online forums that could be suitable for this, but I was thinking if there might be some.. or one that would be the best choice for this specific project. There are several CG websites that could point out technical issues or just generally say if the work was good or not, but I figured that the biggest World of Warcraft fansite would be a great choice in order to get honest opinion.
The people over at MMOChampion.com are amazingly helpful and the community is huge. I've gotten loads of replies and people started to really build up interest around my work.
I've felt that it would be embarrassing and wouldn't help my reputation much if I don't keep the community updated, so I have often posted work-in-progress images
The forum thread can be found HERE.

This was a good way to test if I've applied the theoretical elements correctly. People over here did not care about the technical stuff. For the technical feedback, I have used websites like Polycount, CGArena etc.


Thursday, November 29, 2012

Optimizing the scene for final rendering

Everything was OK up until this point, except for the render time.
I am aiming for an animation that consists of about 900 frames and I don't have more than 3 days to render. The render time at this moment at 800x600 resolution was 14 minutes. 3 days means 4320 minutes in total, which for 900 frames allows me a MAXIMUM of 4.8 minutes/frame.
I need to lower my rendering time below 5 minutes, that's the key.

But, how to do this? This is a third of the current render time. I need to look at the rendering process and identify the most influencing factors.

Global Illumination has the biggest impact on time it takes to render. This is the process where the program looks at your lights and determines what surfaces they hit. Then, the program needs to calculate how the light bounces off that surface and illuminates other surfaces as well. The light keeps bouncing until it completely decays. The color not only bounces with its original color, but picks up the color of the surface it touched, hence making the calculation of these procedures even more complicated.

So, my idea was to somehow play around with the GI to get a decent enough result, but with less than a third of the current render time.

I have a very animator friend, Kosza Arnold, who has created several animations with a lot of environments in them. I have talked to him about my GI issue and he suggested I look into Lightmap baking.


Lightmap baking is the process of taking the Global Illumination information and putting it straight into the color textures of your objets. Up until now, the color of my objects contain the pure color information, blended together with the Ambient Occlusion map. What Lightmap baking does is that you put the illumination information straight into the color map. So, basically that is the color and you don't have to render the GI out for each frame.
This would significantly lower my render times.

I've done research on how to go about this technically and have found an amazing plugin for 3DSMax, called Flatiron. Flatiron allows you to create Lightmaps in a very fast way. Although, I did not really know how to properly use the plugin at first, as the tutorials provided on their website are not thorough enough. I took a lot of time experimenting and re-doing the lightmap baking process, but in the end it completely paid off.

The result was that I had a scene in my viewport, in FULL REALTIME looking like my 14 minutes long render. Basically, rendering out a frame with all the necessary passes took around 50 seconds. Compare that to 14 minutes and it becomes clear how innovative this procedure is.

Before
After
Before
After

Tuesday, November 27, 2012

Final lighting system

I've done some research on common lighting setups and how they can have different affects on the final outcome. This was done to create a logical setup for my scene as well.


I have also looked at Digital Tutors' Exterior Rendering Techniques with mental ray and 3ds Max to translate the theories to actual technical practice. Even though I am using VRay to render out my animation, the main technical elements are pretty much the same in both renderers and any technique can be easily "translated" from one rendering engine to another.


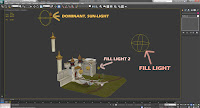
I have used a 3 point lighting setup, where I have a dominant light (orangy color, high intensity) coming from behind the gate, simulating the sun. I`ve also set a fill light in front of the gate (redish color, half the intensity of the dominant light), high up in the sky and another light (redish color, but more towards the whites) in the middle of the scene to brighten things up so the details are more visible.